In search of: the perfect gold nail varnish

You know, sometimes you get an idea in your head, and you just can’t shake it out. I was like that with gold nail varnish for the past year and a half. I got it in my head that what I really NEEDED for the holidays was gold nail varnish. Proper bright, sparkly, beautiful, rich gold nail varnish, varnish that would say “HELLO CHRISTMAS! Yes, indeed, I am ready to party!”

People, I am pleased to say, my search is over.

IMG_5737

Please excuse the hasty rush job on these nails, I got over-excited when they were drying… Sigh. Anyway, I hope you can see that gorgeous shade on the bottom thumb there – that is the gold of my dreams! What is this exotic metallic varnish called, I hear you cry?! Why, it’s OPI’s Goldeneye! The MUST-HAVE gold varnish for 2012, I reckon!

In a clockwise fashion from the bottom, these are the ‘gold’ varnishes I am wearing: Goldeneye (OPI, the clear winner), Gold Coin (Revlon, just not at all what I hoped for, it’s basically just silver!) Glimmer (TopShop, my second favourite, but more of a bronze), Gold (GOSH, another tame looking gold), then Star Dust (Rimmel, another bronzy one).

Here, though, is the clear winner. Isn’t it beautiful? You can purchase this shade from HQHair for £11.

My first GlossyBox: November 2012

I recently heard about GlossyBox after trawling through lots of different beauty blogs, so I had to try it out myself! The company offers a monthly delivery of a range of beauty samples for a set price (£12.95 per month, but there are a range of cheaper options for longer subscription times), with different themes and random contents every month. I love surprises, and I love trying new things, so it sounded right up my street!

Untitled

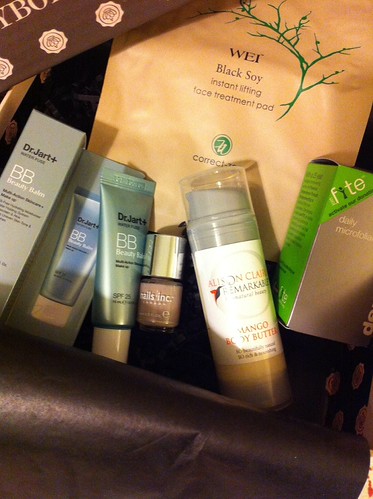
Here’s my first delivery! The first thing I noticed is that these things really are packaged incredibly beautifully – in a patterned cardboard box for postage, and inside, a tough gift box, tied with a ribbon. Gorgeous!

I got the Dermalogica Daily Microfoliant (which I actually used to use, so am very happy to receive again to see whether it still works on my skin), the Alison Clare mango body butter (used already, very nice smell, and thick formula – although you need to squeeze quite  hard to get it out of the bottle!), the Dr. Jart Water Fuse Beauty Balm (never would have tried this product, but I’m very intrigued to see whether it’ll work for me), the Porchester Square Nails Inc varnish, and the Wei Beauty face treatment pad! Looking online, it seems like not many people got the face treatment pad, so I’m very honoured (especially as this is a full sized product, and very pricey).

Check back another day for my review of the Wei Black Soy treatment pad, and my thoughts on the other products in the box.

Trip to the Isle of Wight

Today I visited family on the Isle of Wight – my Hush order arrived on Friday, so I was able to wear a new outfit as well as having an awesome day at the same time! I wore my new Sloppy Joe Dress in grey marl, and my L/L Stretch Tee in black, and together they really were incredibly warm and comfortable. Hush definitely deserve their reputation as a company for comfy clothes that are perfect for casual weekend outings – and the pockets on the Sloppy Joe dress are perfectly placed for mooching about in!

I wore the dress with a dark pink Fisherman’s snood from Oasis, and over the top was a giant coat I picked up from the Next clearance store in Portsmouth Gunwharf Quays back in April. I also took my red Alessandra crossbody bag that my friend Lisa bought me for my birthday in Accessorize. All set!

image

I had a blast visiting Osborne House – my nan, in the first picture, actually worked there as a maid during the ’50s, so it was fascinating to hear all of her memories about the place. And, as you can see, we had to have a go on the carousel too!

At the end of the day, we went to visit the shops on the seafront, and we wound up popping into Cameo of Cowes – hence the bags you can see in my hands in the photo on the top right! The shop sells unclaimed items bought/salvaged from lost property, and it’s a complete goldmine. I’ll post what I bought another day – needless to say, I am very pleased with my bargains, and it took a lot for everyone to drag me out of the shop! If you’re ever in Cowes, make sure to visit – it’s located at 16 Bath Road. I know I will be back, and probably with a bunch of friends in tow!

French Sole Olympic Henriettas

Do you remember in my French Sole Warehouse post, when I mentioned those amazing Olympic Henriettas that I stalked for months? Well, here they are! Untitled

Aren’t they gorgeous?

Untitled

They have a beautifully decorated interior too – check out that amazing flag design! (London Sole is the company’s name in the US, in case you were confused!)

Untitled

I also love this red gosgrain ribbon detailing at the back. I love everything about my shoes – especially the fact that I got to actually wear them to the Olympics this summer! Here’s a photo for proof, in which it looks like I’m trying to kick everyone in the head, which is just an added bonus…

IMG_3713

Although this exact design is not available any more, you can buy Union Flag Henriettas with navy trim at French Sole’s website for £130. Sigh… Is it wrong to have two pairs of Union flag ballet flats?

Much love for the Powderpuff Girls: my vintage makeover

I love the vintage look, but I don’t indulge myself very often. See my post on Hush – I work from home, and the postman just isn’t as ready with the compliments as she should be, so I generally slob around with no makeup on, wearing comfy clothes and a dressing gown (actually a Wonder Woman dressing gown – she’s glam, right?).

But when I do go all out, I like to do it properly, and one of my favourite indulgences is a makeover at The Powder Room!

This company offers a selection of reasonably priced beauty and hair services, and I’ve been there twice for makeovers since I found out about them. The first time was for my hen party, and the second was recently, when I had to attend a party for work.

Powderroom

The salon isn’t that easy to get to on the Tube to be honest, you have to walk about 15-20 minutes from the nearest station, but once you get there it is totally worth it! There’s a lovely atmosphere, cocktails on hand (for £5, not bad!), and everyone is beautiful and happy. Heaven!

When you get your makeover from The Powder Room, they offer you a look book to go through with different hair styles or make up. Both times I’ve chosen the same thing – a pony tail with a quiff, and a cat-eye with red lip for my make up.
IMG_3265

Looks pretty snazzy in front of that Tube sign, doesn’t it? Totally unintentional, but I love it!

IMG_3266

The great thing about this make up is, it lasts so much longer than when I do it – and I can NEVER get my eye liner to flick like that, no matter how hard I try… Sigh. They also use lip liner, which is great – I so need to get one of those. It just makes everything look neater and last longer.

IMG_3277

Here’s a photo of the detail at the back – I’d never be able to get my hair looking like this in a million years… (And this is back at the hotel, after the party, about 12 hours later!)

Has anyone else been to this parlour of perfection? What did you get done? Anyone planning to go in the future? And, has anyone tried the ‘tricks of the trade’ lesson for £60? I would love to try that out!

Visit the boutique’s website here, or check out main site here – they also do events and parties, and they have an online shop as well!

Clarins Odyssey Eye Palette

One of the hottest beauty products for 2012 is the Clarins Odyssey Eye Palette, four beautiful shades to see you through the festive season! As soon as I saw it, I had to bag one, because I’m a huge fan of blending gold eyeshadow in with a smokey eye during winter, to glam up a classic look for parties. Usually I achieve this with Pixi’s Nude Shade Wardrobe and a tap of MAC golden lemon in the corner of my eye, but I was eager to try something new!

Untitled

I had originally wanted to get this from my local John Lewis, but when I walked up to the counter, the Clarins’ lady shook her head ruefully at my enquiry as to the stock – seems like this is a real best-seller!

Untitled

It’s not hard to see why – these shades are MADE for the winter party season!

Untitled

Adding a touch of glamour and luxury, the palette comes in a pretty little red velvet pouch.

UntitledAlthough I was expecting the case to be metal, it was actually plastic – I guess it’s more practical in the long run and less prone to scratching or denting… The palette itself features a beautiful etched design on gold. Truly a beautiful Christmas item.

Untitled

Inside you get four pretty shades – three fairly standard for the ‘smokey eye’ look, and one rather special gold one! There are also two applicators.

Untitled

That gold is so complex and beautiful! Let’s take a closer look, shall we?

Untitled

I’d heard this had great staying power, but I was still surprised at how smoothly this went on, and how well it stuck to my skin! The shimmer is fantastic, and I cannot wait to try out the smokey eye look with gold featured on the card that came with the set.
Untitled

The palette is still available online at Clarins for £30 – but get in there quickly, because this seems to be selling like hotcakes! As an added bonus, if you order from Clarins’ site, you get to pick some free samples with your order – perfect!

Lust List: Hush loungewear for Christmas!

If there’s one thing I wish I had more of, it’s loungewear. I work from home, so being comfy is my top priority – most days, the only person I’d be likely to impress with my sartorial choices is the postman. My ‘uniform’ mostly consists of a pair of jogging bottoms, a slobby T-shirt, and a dressing gown. So when I saw Hush’s range of luxe loungewear, I fell in love! Well, who wouldn’t?

I already put my order in (whoops!), but while I wait for it to arrive, here are some other items from the range I’m lusting after! The beauty above is the Black Felted Wool Dress (£95), which looks incredibly stylish while promising much cosiness for the winter season. Comfort and style – I love it!

If there’s one thing that has to be on my Christmas gift list this year, it’s this Cardigown. A cardigan crossed with a dressing gown, this is actually exactly the sort of thing I’ve been looking for all these years, without ever really knowing what it was called, or if it even existed! The Cardigown is available here in ‘fog’ (as above) for £85, and is also available in dark navy here. I certainly wouldn’t be embarrassed to open the door to the postman wearing this!

Now, this one might be controversial – I know that before this year, I would have turned my nose up – but harem pants! Don’t turn off your computer in disgust just yet… Harem pants may seem a bit weird looking, but when it comes to loungewear, I promise there are very few styles of trousers that are more comfortable. I first tried some on when I started going to belly dancing classes, and I couldn’t believe I’d allowed myself to overlook them for so long. Forget yoga pants, forget jogging bottoms, these are just the most gloriously comfortable things you can wear on your bottom half, in my opinion at least! My ones are considerably less snazzy than these, as they came from Primark, but I’m sure you’ll agree that Hush’s version is pretty darn stylish. Some harem pants have a really low crotch, and I think that’s what puts people off, but this pair are styled in such a way that you can actually wear them outside the house without fear of ridicule – as the model above so aptly demonstrates! Hush harem pants are available in dark burgundy, as above, charcoal grey, and black, for £49.50.

Last on the Lust List (for today) are these gorgeous star pyjamas! I love the design of these, but I don’t think I’d be comfortable in white PJs (too many spilled tea incidents in my past to relax wearing white, I’m afraid), so I wish Hush would offer some with the reverse design – i.e. white stars on black. Hush have a range of pyjama sets, including the darker set below, priced at £49.50 per set, here.

Hush also offer bundles which give good discounts when you buy sets together, which is a nice touch (and what prompted me to empty my wallet – and I was being so good, too!). Check out the site here, and come back later in the week to find out what I thought of my (first?) delivery!

Halloween spider hat tutorial

This Halloween, I decided to challenge myself to make part of my outfit. I have a some specific rules about my Halloween costumes – firstly, that I don’t wear wholly pre-packaged outfits. Nothing off the peg for me, thanks! Thirdly, it has to be scary, or based on a Halloween theme. I guess this is pretty European-centric of me, because I know in the US, Halloween isn’t restricted to spooky costumes. But I love spooky things, so I’m always up for dabbing on the fake blood! Thirdly, I try to dress up as a different version of myself – this sounds very weird, but by that I simply mean that instead of dressing up like a specific person or character, I instead try to imagine what I would wear if I was a witch, vampire, or whatever. I’m sure a lot of people do the same thing! Last year I actually broke this rule when I dressed up as Morticia from The Addams Family, but hey – rules are meant to be broken…

As I’ve been doing this Halloween thing for a good many years now (ouch, how old am I?) I’ve already cycled through the obvious candidates – zombie, witch, vampire. So this year I decided to confront my fears head on and go as ARACHNIA! SPIDER WOMAN. Very scary. Mostly, it’s because I had seen these amazing cobweb style hats, and I wanted to wear one… Unfortunately for me, they were all pretty expensive, so I decided to make my own version. Startlingly, I really didn’t need to buy much in order to make this – but then again, that’s because I’m a failed craft nut, who had bought too many supplies and never used them.
IMG_5804

So, here is what you need to make your own cobweb hat! Halloween hat tutorial

Supplies:

  • Sinamay hat base – any colour, round
  • Black felt
  • Pins
  • Wooden skewers
  • Black paint
  • Paint brush
  • Black embroidery thread
  • Needle
  • Hairband
  • Scissors
  • Plastic spiders

Method:

    • Cut your skewers in half – they form the arms of the cobweb. Also, cut off the pointed tipsHalloween hat tutorial
    • Paint your skewers black – you might need several coats of black paint to get rid of all the streaks. This gives them time to dry while you continue with the rest of your project.

Halloween hat tutorial

    • Cut your felt a little larger than your hat base, then pin in place.

Halloween hat tutorial

    • Sew the felt onto your hat base with the black thread.

Halloween hat tutorial

    • Once you’ve covered your hat base with felt, you can either attach the headband now by sewing it on, or wait until you’ve constructed the cobweb. Either way, it can get fiddly! When you want to attach the headband, pin it in place, then use your thread to secure it in two places onto the base.
    • Time to make the cobweb. Your skewers will be arranged in the classic spokes pattern, like this.
      Halloween hat tutorial
      So, now you sew each spoke onto the hat using your black thread. Sew in two places to make it extra secure – just loop around the skewer, back under, and around again, almost like sewing on a button. You might find your cobweb looks more even if you sew four skewers on at the compass points, then fill in the gaps afterwards. Also, remember to leave a small gap in the middle so that your skewers don’t sit on top of each other. Place a plastic spider on this at the end to hide the gap! Before you add in your final skewer, though, grab your black embroidery thread bundle, and tie the end carefully onto the end of your final skewer. Then sew on as the rest. Tying the thread on at this point will make it less fiddly to attach!
    • This rope demonstrates how to arrange the black embroidery thread onto your spokes to create the classic cobweb effect. Taking your embroidery bundle, weave the thread around the skewers, creating a loop over each stick to keep in place. This is tricky. You need to keep the sticks pulled apart so that the thread stays tight across the loops. Even so, you’ll find that it’s very difficult to keep everything looking tight – but that’s part of the homemade charm, right?

Halloween hat tutorial

  • At the end of the sticks, tie your thread off, then trim the end. If you haven’t attached your headband, do so now.
  • For some optional final touches, add in a fake spider in the centre of your web to hide the spokes, and add another, smaller spider dangling from a thread at the front of the hat!

IMG_5817

So, that’s how to create your own cobweb hat! Here’s a slightly better picture of the hat with the spider in the centre!

Halloween hat tutorial

Anyone going to give this a try next year?

Glitter and glimmer: Effie Trinket’s reaping nails

I’ve always been a tad lazy when it comes to nail varnish – if you call lazy sticking to plain colours! Nail art and decorations always felt a bit beyond me, but when I saw Effie Trinket’s amazing reaping nails in The Hunger Games, I knew I had to try and replicate it for my Hunger Games party costume! While my finished nails look nothing at all like Ms. Trinket’s, I am actually really pleased with the effect that I came up with – glittery gold over festive fuchsia, just right for the holiday and party season coming up! Glitter and Glimmer nails

To achieve this effect, I layered two coats of Fuchsia Hype nail varnish by Bourjois, and allowed to dry. Then, using a makeup sponge, I patted over bronze Glimmer by Topshop three times – once over the whole nail, second just the top half, and the third time, just the tips – making a graduated effect where the bronze shade was much thicker towards the end of the nail. Then I covered the whole lot with Saffron London’s gold glitter, and finished with a top coat. Honestly, this is probably the most complicated thing I’ve ever done to my nails – but it definitely wasn’t difficult, it just involved a lot of stages and layers. I used to find that my nails took so long to dry if I applied more than one coat, but these days it seems like formulas dry quicker, so it’s not as much of a pain as it used to be…

Anyone else tried to do an Effie on their nails? What did your end results look like? And, if anyone gives this a whirl, let me know!