Greater Than The (Dim) Sum Of Its Parts

Rumour has it that the best dim sum in London is to be had at the Royal China Group, so I was only too happy to pop along to the flagship Baker Street branch when they asked me to review their spread.

Dim Sum small (3)

Dim sum is one of China’s worst kept culinary secrets – you might think you’re content with sweet and sour pork balls and some egg fried rice, but if that’s the extent of your knowledge when it comes to Chinese cuisine, you’re missing out on an amazing experience! And when you finally get yourself to a dim sum place (especially one as good as this) you’ll realise you’ve been in the dark for far too long…

Dim Sum small (6)

The Royal China Group has locations all across London, including the aforementioned Baker Street branch (Baker Street is also home to the Royal China Club, the premium restaurant in the chain), as well as Canary Wharf, Queensway, Fulham and Harrow-on-the-Hill. Each restaurant has its own dedicated dim sum chef, and serves dim sum from noon to 5m – and believe me, the tables fill up fast, so if you want a seat, book ahead, or get there early!

Dim Sum small (2)

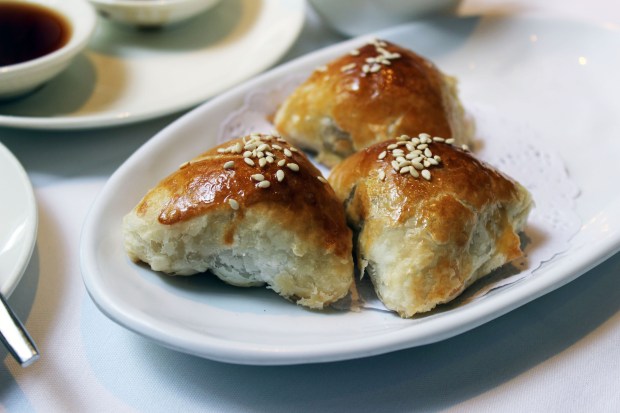
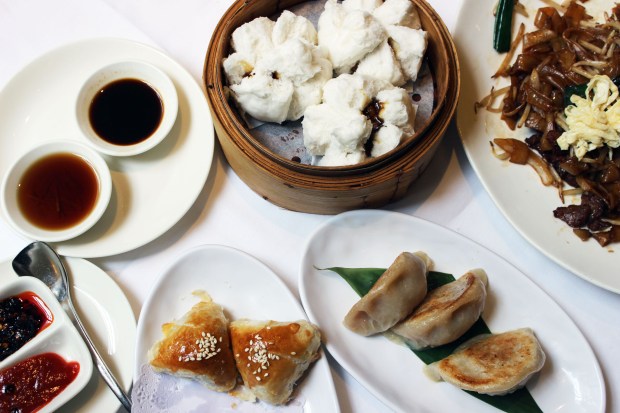
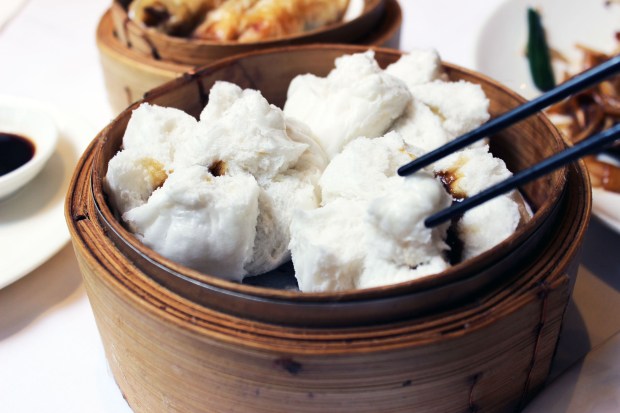
One of the most popular dishes on the dim sum menu is cha siu bao, or steamed roast pork buns, but don’t miss out on these gorgeous honey roast pork puffs, pictured above. While cha siu bao are traditionally served in a sugary, steamed, marshmallowy bread bun (second image), the pork puffs have the same sweet and savoury roast pork filling encased in flaky, buttery pastry. These didn’t last long!

Dim Sum small (7)

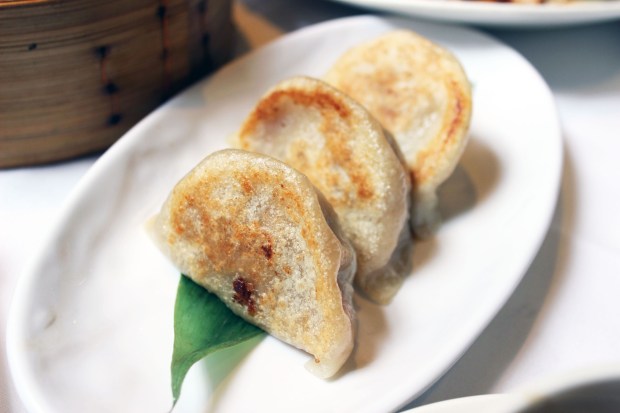
If you’re a fan of the Japanese gyoza, you should definitely try the original Chinese version. Thicker dough wrappers and a more amalgamated centre portion gives these a chewier texture – and they’re just as delicious as the Japanese ones!

Dim Sum small (1)

At dim sum, the idea is that all the guests select their favourites from a menu of tiny dishes – almost exactly like Spanish tapas or Greek / Turkish mezze. But don’t forget to check out Royal China’s scrumptious noodle dishes too, to bulk out your meal – we ordered the Soy Beef Ho Fun, above, and it was one of the tastiest noodle dishes I’ve had in a Chinese restaurant for a long time. Wide strips of noodles, tossed in soy sauce with generous strips of sliced beef, accompanied by spring onions, beansprouts, and topped with an egg, this was a great way to keep the meal flowing while we waited for various dishes to arrive.

Dim Sum small (4)

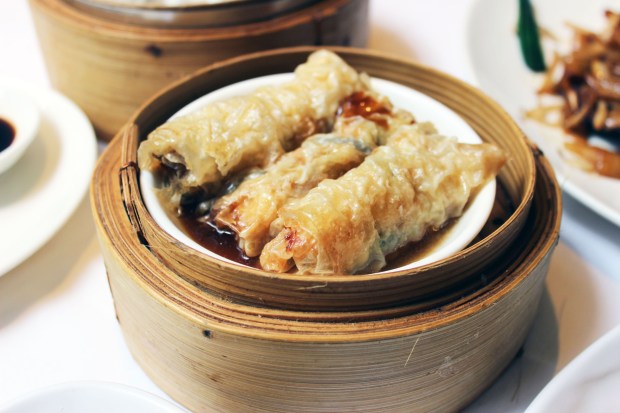
If you’re ordering dim sum, you need to move away from your comfort zone somewhat – otherwise you’ll miss some of the most delicious and intriguing dishes! These stuffed bean curd rolls were a case in point – earthy, wood-scented mushrooms with prawns, encased in a stiff, chewy casing, they were unlike anything you’ll get from your local takeaway.

Dim Sum small (8)

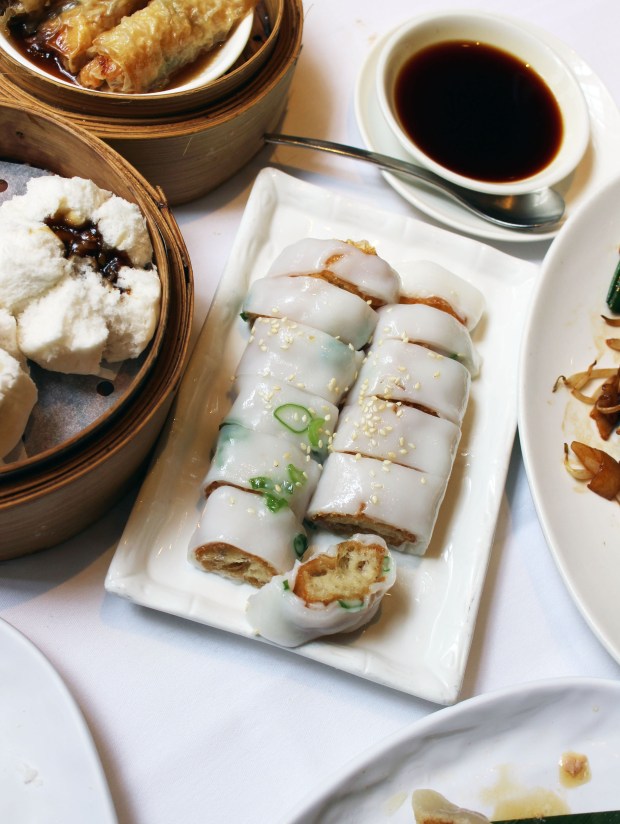
Also, this fried dough cheung fun – a slippery noodle layer encasing a spear of fried dough, served with a sweet soy sauce dip. The texture contrast is what makes this dish so moreish, and again, so very unlike anything you might be used to if you have a western palette!

Dim Sum small (9)

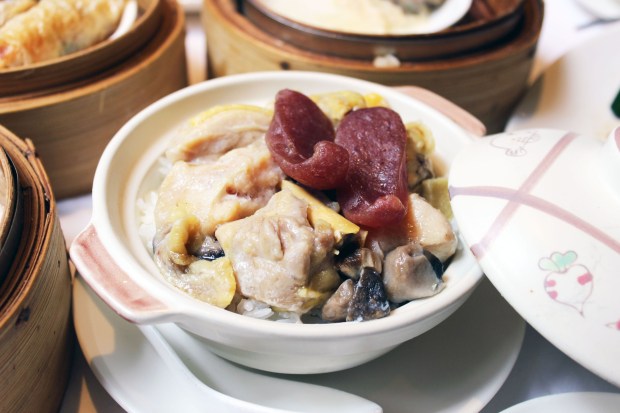
We also tried the Chinese rice pot, which was a pottery lidded dish stuffed with delicate rice, topped with corn-fed bone-in chicken, mushrooms and Chinese sausage, again served with a tasty sweet dip.

You also have to give the steamed meatballs a try (succulent beef with preserved orange peel and spring onions) – and make sure to round off the meal with egg custard tarts served with Chinese tea!

Three or four dishes will be more than enough to fill you up at a dim sum lunch, so pace yourself! The Royal China menu has most of its items priced at £3-4, although some items are more expensive (and the large noodle dishes, which are big portions, are around £8-9).

Also, whatever you do, don’t forget to check out the cocktail menu! I can highly recommend the Royal China Martini!


Head to the website at www.theroyalchina.co.uk to find out more about the restaurant group, find a branch near you, and to look at the menus. Royal China also do a more traditional ala carte menu, as well as tasting experiences as well! Check out the dim sum menu here, and try not to drool on your screen!

The meal I enjoyed at Royal China was complimentary – the views in this review are my own.

Save

Steamed fish for Chinese New Year: a healthy celebration recipe!

Five years ago, when I started blogging, the first thing I wrote about was Chinese New Year. So it seems appropriate to come back to it in time for the Year of the Snake (which is to be celebated tomorrow, on Sunday 10 February) with a healthy recipe that is packed full of flavour, looks ambitious, but in reality is incredibly easy to prepare.

Just like a lot of the traditional foods consumed during Chinese New Year, steamed fish is symbolic because the word in Chinese, ‘yu’, sounds like ‘wealth’ or ‘abundance’. Many festive foods revolve around similar Chinese puns, which is great fun to discuss during dinner, but hard to replicate unless you’re very fluent in Chinese!

Chinese New Year steamed fish

You need a whole, white fleshed fish to make this dish – pink fleshed fish such as salmon or trout are too strong for the delicate seasonings used here. You can be flexible with the type of fish you buy – go for what looks the freshest, or take advantage of a special offer. Sea bass is usually an expensive option, but consider bream – my favourite! Ask your fish monger for advice if you’re not sure which type of fish to buy.

When you get your fish, chances are it will be gutted but not descaled. If you can get the fishmonger to descale it for you, all the better, but it’s not too difficult to do at home, and it keeps the fish fresher if you do it just before cooking. Simply rub a spoon (or knife) firmly along the fish, towards its head. This can be quite messy, so ensure you do it over a sink, and wash the fish after to remove all the inedible, loose scales. If you’re not used to cooking with fish, it could be hard to tell if the fish has scales or not – rubbing a spoon or knife backwards over the fish will soon help you tell. Whatever you do, rinse the fish thoroughly afterwards!

Chinese New Year steamed fish

INGREDIENTS

  • 500 –750g whole white fish
  • 3 spring onions
  • 2 cloves garlic
  • 1 inch ginger
  • 2 tbsp fermented black beans
  • 1 tbsp soy sauce
  • 1 tbsp rice wine
  • 1 tbsp sesame seed oil

Chinese New Year steamed fish

(In order to cook this dish, you will need a steamer – it sounds obvious, but make sure your fish will fit in your steamer before you buy it! Electric steamers are more convenient for this dish than bamboo steamers on a wok, mostly because they are generally oval, and therefore fish-shaped!)

METHOD

  • Wash and dry your fish thoroughly. In a shallow dish, pour over the soy sauce and rice wine, then sit the fish in the fridge for ten minutes to marinate while you prepare the other seasonings.
  • Clean the spring onions and shred them finely. Crush the garlic with a garlic crusher. Skin the ginger (you can do this really easily by rubbing on the papery brown skin with the side of a spoon) and slice it, then cut it into fine matchsticks. Wash the black beans thoroughly, then crush them slightly to release more of their flavour.

Chinese New Year steamed fish

  • Remove the fish from the fridge, and place it either on a heatproof dish that will fit your steamer, or in strong, double wrapped foil. Scatter the seasonings over the top and inside of the fish, then pour the liquid marinade on the top, along with the sesame seed oil.

Chinese New Year steamed fish

  • Steam the fish for at least ten minutes. You can check whether the fish is done by pressing the flesh with chopsticks or your fingers. If the flesh is very firm and doesn’t flake, or still looks translucent, it will need longer. Check the manufacturer’s advice for cooking fish in your electric steamer.
  • Serve the fish on an oval platter, picking the flesh away from the bone with your chopsticks. Don’t forget to eat the tasty cheek flesh – or save it for your honoured guest! Serving a whole fish is a traditional way to end a banquet, but if you don’t like the thought of eating a fish with the head on, the flesh can be stripped from the bone before serving instead – but do try this recipe with a whole fish, as fillets of fish can produce a drier finished dish.

Chinese New Year steamed fish

A Cantonese way of finishing the dish is to heat a couple of tablespoons full of hot vegetable oil in a wok, in order to pour it over freshly sliced spring onions and ginger which have been laid over the surface of the cooked fish. This then cooks the aromatic seasonings, as well as crisping the skin of the fish slightly. I left this step out to make the finished dish healthier, but I won’t tell anyone if you give it a go!

Boxing Day Ideas for Turkey Leftovers!

This is a flashback post that some of you might have already seen at Thanksgiving – but I thought it was worth a repeat for all the UK-based readers who will be up to their eyeballs in turkey this Christmas! Here are some great recipes using leftover turkey that taste so delicious you’ll want to cook extra next year!

Leftover mosaic

Week One: Feel Good Chicken Broth - Broth before stock

Gingery Chinese spring rolls

These are seriously the most delicious spring rolls I have ever eaten, so I’m really excited to share the recipe with you – I hope you get a chance to try them out and fall in love too! Forget soggy beansprouts and weird gloopy sauce, these spring rolls are a meal in themselves – because you won’t be able to stop eating them once you start…

You can freeze these ahead of when you want to eat them,  but you should thaw them before deep frying. Just prepare the filling and roll up the wrappers, then pop in a single layer in your freezer. The ones pictured are normal size, but for bentos buy a large packet of spring roll wrappers and then cut them into quarters for cute mini spring rolls!

Chinese spring rolls

INGREDIENTS

  • 1 pack large spring roll wrappers
  • 2 chicken breasts, shredded
  • 75g cooked prawns, cut into small pieces
  • 4 spring onions, finely chopped
  • 100g bean sprouts
  • 75g grated carrot
  • 50g grated onion
  • 3 square centimetres fresh ginger finely chopped
  • 3 garlic cloves finely chopped
  • 1 beaten egg
  • 1 1/2 tablespoon light soy sauce
  • 1 1/2 tablespoon oyster sauce
  • 1 1/2 teaspoon sugar
  • 1 teaspoon sesame seed oil
  • Pinch chilli flakes (optional)
  • Oil to stir fry and deep fry

METHOD

  • Mix together the soy sauce, oyster sauce, sugar, sesame seed oil and chilli flakes.
  • Heat your wok to a medium heat. Stir-fry the chicken in 1 tbsp oil until it’s white, then reserve and drain. Remove excess moisture from your wok and heat some more oil.
  • Fry the ginger for 30 seconds, then add the garlic, frying for one minute. Add the grated onion and spring onion and cook until it has softened. Watch your temperature here – you don’t want to brown the ingredients. If the wok gets too hot, remove it from the burner for a few seconds.
  • Add the carrots, bean sprouts and prawns and cook until the bean sprouts are slightly translucent.
  • Pour on the beaten egg and mix. When the egg has solidified, add the soy sauce mixture and the egg and mix thoroughly. There should be no excess liquid – all the seasoning and egg should cling to the ingredients. Leave to cool.
  • To assemble your spring rolls, place your spring roll wrapper diagonally on the work surface and fill the corner nearest to you with a tablespoon of mixture.
  • Pull the corner up over the top and then roll twice – you should now be roughly to the centre of the wrapper.
  • Fold the two corners in to the middle and then continue to roll it up, sealing the end with water – this is vital or your roll will pop open when you fry it.
  • Now for the deep frying – at this point it’s probably best to say that deep frying can be very dangerous – if you’re concerned, then use a deep fat fryer at 170 degrees centigrade to cook your spring rolls. Heat the oil in a pan. Test the heat by adding a spring roll – if it sizzles and the oil bubbles around it vigorously, you have it right.
  • Cook on each side for a couple of minutes, then drain. If your rolls go dark brown too quickly, turn your heat down.
  • You can make a dipping sauce with light soy sauce, and rice wine vinegar to taste. Add chilli flakes, chopped spring onions or a slug of sesame seed oil for a special touch.

Follow my blog with Bloglovin

What to do with leftover chicken and turkey: chicken egg fu young

Egg fu young is a very westernised dish; basically a Chinese take on an omelette. The name is said to derive from ‘fu young’, which is a kind of hibiscus with beautiful flowers. The dish consists of eggs cooked like an omelette, with a variety of fillings, served with a savoury brown sauce. You can adapt this recipe to use a huge variety of different fillings – I’ve used prawns, ham and chicken/turkey – but use any filling you like!
Egg Fu Young finished close

INGREDIENTS

  • 4 tbsp vegetable oil
  • 2 cloves garlic, minced
  • 4 spring onions, finely chopped
  • 100g beansprouts
  • 75g left over chicken or turkey
  • 75g raw prawns
  • 75g ham, cut into small pieces
  • 6 eggs, beaten
  • 1 tsp soy sauce

Sauce

  • 200ml chicken stock
  • 2 tbsp soy sauce
  • 1 tbsp oyster sauce
  • 1 tbsp cornstarch
  • 2 tbsp water

METHOD

  • Prepare the sauce by adding all of the ingredients except the cornstarch and the water to a saucepan.
  • Heat 2 tbsp of vegetable oil in your frying pan, and put over a high heat. Add your garlic and spring onions, and allow to fry for a few seconds, until they begin to smell fragrant. Add the beansprouts and stir fry for a minute, then add the raw prawns, chicken and ham, and cook for another minute, or until the prawns are cooked through. Drain the excess liquid off and into your saucepan for the sauce – this ensures your omelette isn’t soggy when it’s cooked. Set the mixture aside, and when slightly cooler, add the beaten eggs and the soy sauce.
  • Clean the frying pan, then add 1 tbsp of oil to the pan over a medium heat, and ladle in half of your egg and filling mixture. Cook for a couple of minutes, then turn over and cook for a further minute the other side.
  • Drain the omelette on some kitchen towel and keep warm. Repeat the cooking process for the remaining oil and egg mixture.
  • Finish your sauce. Bring the sauce to a boil, and meanwhile mix the cornstarch and the water together thoroughly. When your sauce is boiling, add the cornstarch mixture, and stir until the sauce thickens and boils.
  • Serve the omelette on a warm plate with the sauce spooned over the top. This will serve two adults for a main course or four for a lunch or snack. If you wish to serve more people, the best thing is to reduce the size of the frying pan you cook the omelette in, as thinner omelettes are harder to turn. Best served with plain rice.

Egg Fu Young finished

Variations

Egg fu young is easy to adapt and you can use plenty of different fillings to vary the taste. If you’re a vegetarian, you can replace the chicken stock with vegetable stock and leave out the meat. You can try bamboo shoots, peas, carrots, onion, peppers, mushrooms, celery, cucumber or water chestnuts. Just make sure that anything canned in water is drained thoroughly, and tougher vegetables like carrots and peppers are cooked through before you make your omelette. Left over roast meat is brilliant here – or try char siu or leftover duck. You can even play around with the sauce – some recipes call for chilli sauce, garlic, spring onions, vinegar, Chinese rice wine and sugar as added ingredients.

Egg Fu Young no sauce

What to do with leftover chicken and turkey: hot and numbing chicken salad recipe

If you feel like you need an unusual recipe for leftover turkey this Thanksgiving or Christmas, look no further! This recipe is from the excellent Sichuan Cookery by Fuchsia Dunlop, which has about four or five easy and tasty recipes for cooked chicken at the front. This hot and numbing chicken mixes spicy chilli oil and toasted, ground sichuan pepper together with soy sauce and sugar to create a really delicious cold dish.

Week One : Leftovers - Hot and numbing chicken and cucumber

INGREDIENTS

  • 300g left over cold cooked turkey or chicken, white or dark meat
  • Bunch spring onions
  • 4 tsp granulated sugar
  • 2 tbsp light soy sauce
  • 2-4 tbsp chilli oil (depending on how spicy you like it – best to start small and add more later!)
  • 1 tsp sesame oil
  • 1 tsp Sichuan peppercorns
  • Cucumber, to serve
METHOD
  • Dry roast the peppercorns in a frying pan, then grind them to produce 1/2 tsp of ground spice.
  • Cut the chicken in slices, and cut the cucumber and spring onions into elegant diagonals.
  • Create the dressing by dissolving the sugar in the soy sauce, then adding in the chilli and sesame seed oil.
  • Arrange the chicken and spring onions on a plate, then sprinkle over the Sichuan pepper.
  • Drizzle over the sauce, and tuck in!
Serve with salad, or white rice.

Drunken Chicken

The idea of drunken chicken sounded kinda good to me… Boiled chicken, marinated in Chinese rice wine, then cut into pieces and eaten with plain rice.

Well, it wasn’t.

Blog warning: graphic, unpretty photos of grey chicken meat below… I know you all come here for my amazing kick-ass photography skills, and I do admit I should probably get some kind of award for it, but even I, with my amazing, elite ability (it’s like a superpower) cannot make a boiled chicken look good. I’d imagine it’s totally beyond the realms of physical possibility, to be honest, because if I can’t do it… well. You know.

No photo of the chook in its packet this time – it looks exactly the same as the chicken in the last week’s recipe, so here’s the costing:

Tesco’s chicken : £3.33
Ginger : 21p
Spring onions : 50p
Rice wine : technically free because it was already in the cupboard, but for 300mls goodness knows

Grand total : £4.04

The method for this is fairly simple – but, it does take several days to actually make this dish.

First of all, you stuff some ginger and spring onions up old chooky’s bum, and place it in a large pan and cover with water. Bring to the boil, skim, and cook for 15 minutes.

Here’s the scary part. When the 15 minutes are done, you have to put a lid on the pan and leave it, off the heat, for three to four hours. The remaining heat in the water will continue to cook the chicken until it’s peachily perfect and deliciously tender. Dare I do it? Dare I risk salmonella on a cheap £3.33 chicken?

Yes, of course!

Week Four: Drunken Chicken skin-on

It went surprisingly well, actually. Here’s the cooked chook with its skin still on – you have to remove it for this recipe, but the naked corpse was a bit too gruesome for a closeup… As you can see, the drumsticks are falling away from the body, which is a pretty good indication that this is cooked through properly. I also pierced the flesh to make sure no pink liquid ran out – it didn’t. We’re good to go!

Now, all that cooking liquid left over isn’t going to be wasted. That’s perfectly good chicken stock. So, we save that and reserve 300ml for our chicken.

Week Four: Drunken Chicken jointed

Next step was removing the skin and jointing the chicken. I’ve never jointed a whole chicken before so I got really nervous and started looking it up in books and looking at YouTube videos to see how it was done. Of course, I forgot that this chicken is already cooked, so it’s much, much easier to joint it. Several times during this I simply used my hands. Yum!

Now, this is where I cheated somewhat, so I can only speculate as to how delicious this would have been if I had simply followed the instructions. Instead of salting my chicken now and leaving overnight, I had already done it. That’s right! I rebelled and salted the whole cooked chicken, leaving in the fridge overnight so I could take better pictures of the jointed bird. Now, I know you are overwhelmed by my stunning piece of photography above and can see how it was totally worth doing this, but you didn’t have to eat the result.

So, skipping the salting bit, because I’d already done it, it’s time to add the marinade to the chicken. It’s now day two, and once we add this marinade, the chicken has to sit for two to three days.

Week Four: Drunken Chicken marinade

The marinade is 300ml of rice wine and 300ml of chicken stock. You can add 2tbsp of brandy if you want. I didn’t.

Now, there’s nothing to this but to leave everything in the fridge, and turn it every so often, dreaming of the delicious chicken you will no doubt be eating – after all, the more complicated and time consuming the dish, the better the results, right?

Nope. After three days sitting in the fridge, this chicken pretty much tastes like you would expect it to taste. Pretty alcoholic. Maybe you need fancier rice wine, maybe you need to be a bit of an alcoholic yourself, but I wasn’t impressed.

Week Four: Drunken Chicken meal

I salvaged this somewhat by serving it with that amazing ginger and spring onion dipping sauce I told you about here, but in all honesty, it was fairly overpowering.

So, the scores.

M gave it 2.5. After being coaxed with the dipping sauce, he gave it 4. Anything below a 5 we had already agreed is in ‘don’t bother making it again’ territory. So, this is the last time in my life I will ever make this dish. I’m not sad.

I gave it 4. It wasn’t really really bad, but it in no way paid off the planning involved in a dish that takes at least four days to prepare.

However, it did give us some lovely chicken stock and PLENTY of leftover chicken…

Incredible salt-baked chicken

I’ve always wanted to try this dish, and it was absolutely amazing. I bought a corn-fed chicken and it made a huge difference. The chicken was fantastic – so tender and moist. Honestly, I never thought it would come out that well, but I was wrong! The only downside is that it was really hard to get a hold of the right amount of sea salt at a reasonable price.

Salt-baked chicken
Also, try the dipping sauce, it is amazing. There’s really no other word for it.

INGREDIENTS

  • Chicken, weighing approximately 1.6kg
  • 1 tsp fine salt
  • 3kg coarse salt, or more, depending on your pan
  • Bunch spring onions
  • Large piece fresh ginger
  • 2 tsp sugar
  • Pinch salt
  • 4 tbsp cooking oil
  • Steamed pak choi and ooked rice, to serve

METHOD

  • Wash the chicken thoroughly inside and out. Sprinkle 1 tsp of fine salt in the cavity of the chicken and rub in. Add an inch of smashed ginger and one spring onion to the cavity. You can also add dried tangerine peel.
  • Select a heavy bottomed saucepan with a lid which is slightly larger than your chicken. Ensure that there is not an excess of space around the chicken, as you will need to use extra salt to cover the space.
  • Place the salt in the saucepan and allow to heat for five minutes, until slightly browned and smoking. Remove half of the salt and nestle the chicken on the top layer of the salt, then pour the rest over to cover. Cover the chicken and cook over a low heat for 10 minutes. Then, remove the pan and place it in a pre-heated oven at 200c or gas mark 6. Cook for 45-60 minutes, or until the juices run clear.
  • Remove the chicken from the salt, and brush off the excess, and rinse before allowing to cool for 20 minutes. Then, chop the chicken into bite-sized pieces. The traditional Chinese method is to cut straight through the bone of the chicken, but you may wish to remove the bones to serve.
  • To make the dipping sauce, peel and grate the remaining ginger, and finely chop the spring onions. Heat the oil in a pan until smoking, then pour the oil onto the ginger and spring onions – make sure you use a heat proof bowl for this! Mix in the sugar and salt to taste.
  • To serve, plate the chicken and allow diners to help themselves, dipping the chicken into the sauce and alternating between the accompaniments of steamed pak choi and rice.

Salt baked chicken - the result!
I’m not going to lie, it was scary. It was fiddly. It was pretty expensive. It involved a lot of trial and error, and also I’m still not totally sure about the best way to cover the chicken economically, but I would so do it again. It was that delicious.